- Magento Connector Install Guide
- Cover
- Start
- 1 - Setup And Prerequisites
- 2 - Magento Setup
- 2.0-Magento-Setup
- 2.1-Quick-Guide
- 2.10-Inventory-Updates
- 2.11-Store-IDs
- 2.13-Assigning-API-Users-To-Roles
- 2.14-Installing-Magmi
- 2.15-Installing-EC-Internet-Indexer-Plugin
- 2.16-Configuring-Magmi
- 2.2-Installing-RAPID-Web-Sync
- 2.3-Installing-Sage-Field
- 2.4-Establishing-Magento-Access
- 2.5-Creating-the-API-Role
- 2.6-Limiting-API-Access
- 2.7-Customers
- 2.8-Order-Level-Access
- 2.9-Catalog-Products
- 3 - IMan Setup
- 4 - Logging & Lookup Tables
- Connector-User-Guide
- 1-Overview
- 2-Magento-Connector-Reference
- 3-Magento-Reader-Reference
- 4-Appendix
- Cover
- Overview
Configuring Magmi
You will now need to configure Magmi to access your Magento installation. This is done with the Magmi Web Interface, accessible via your_magento_installation/magmi/web/magmi.php.
Here you will be presented with a number of different settings panels. Under Configure Global Parameters, you will need to enter your Magento web server’s SQL information.
By default, Magneto uses “magento“ as the Database name, and the prefix is left as blank. Your situation may vary depending on how Magento was installed. Be sure to double check all parameters before saving or continuing.
For Magento installations later than 1.7.x, you will need to choose 1.7.x as your version in Magmi. Additional, your filesystem path for Magento should remain at the default of “../..”
Finally, enter your username and password for your SQL server. When done, your screen should resemble:
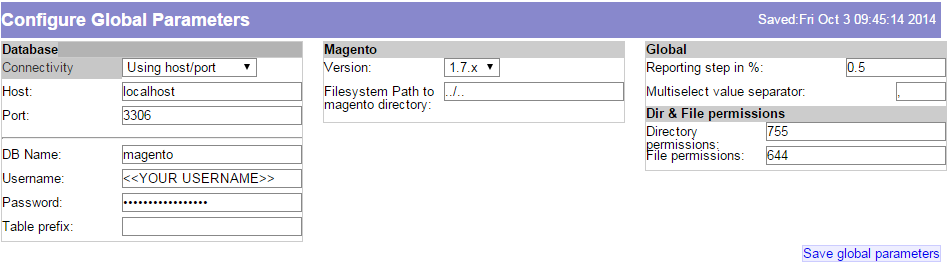
Click Save global parameters. Next you’ll need to enable a few of the plugins Magmi comes with, and the one we installed prior. This can be done in the Configure Global Profile section.
Check the following plugins to enable them:
- Magmi Optimizer v1.0.5
- ECInternet Full Indexer v0.0.1 (Installed in above section)
- On the fly category creator/importer v0.2.4
- Tier price importer v0.0.9a
Click the Save Profile button at the bottom of the page. Your Magmi installation is now complete.
![]() © 2015 Realisable
© 2015 Realisable